Difference between revisions of "TAOR"
(Created page with "{{Partof_Military}} ==Tactical Areas of Responsibility== In military terms, a ''Tactical Areas Of Responsibility'' is a prescribed area in a theatre that is assigned to a un...") |
(No difference)
|
Revision as of 05:26, 19 September 2014
| |
ALiVE Military |
Contents
Tactical Areas of Responsibility
In military terms, a Tactical Areas Of Responsibility is a prescribed area in a theatre that is assigned to a unit commander who is responsible for the conduct of tactical operations, defence, coordination of support and conducting patrols. They represent a zone or boundary area in which the forces under command will operate.
In ALiVE, TAOR markers can be placed on the map to include a number of tactical objectives, which are used by the Placement modules for placing (spawning) units, by OPCOM for attacking and defending and by Military Logistics for delivering battle casualty replacements. Placement modules and OPCOM can have more than one TAOR and they do not have to be the same, so it is possible to create very flexible scenarios.
Place the Markers
The first step is to place the markers. It is important to ensure that the TAOR markers cover at least one relevant objective because ALiVE uses these both to spawn units, for OPCOM to assault and LOGCOM to delivery reinforcements. If no recognisable objectives exist on the map, you can place a Custom Military Objective module inside the marker instead.
- Military Placement requires a military establishment such as a camp, barracks or airfield.
- Military Civilian Placement requires a civilian infrastructure target such as a factory, port or power station.
- Military Logistics can use any recognisable objective but works best if there is a helipad or runway available.
Tip: Use colouring to make it easy to identify which TAOR is assigned to each side. Note also that the markers must be circles or squares. For some reason ovals (ellipses) won't work.
Place the Modules
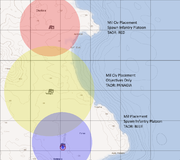
Drop each Placement module on the map and set them up as desired. In the example above, the Northern most module is a civilian area, so we've placed a Mil Civ Placement module and set it to spawn a Company of OPFOR in TAOR: RED. This will mean OPFOR only spawn in the RED area. The Southern most area is a military airfield, so we've placed a Military Placement module down and set it to TAOR: BLUE.
In this scenario, we want OPFOR and BLUFOR to fight it out over the central Panagia area, which starts as a neutral zone but we still need OPCOM to recognise it as an Objective. So we've placed a Mil Civ Placement module and set it to TAOR: PANAGIA but left it on Objectives Only (no units will be placed here).
Check Objectives
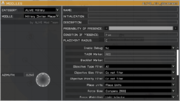
A good tip is to turn Debug on each Placement module and preview the mission to check that the TAORs have at least one objective showing up correctly. The labels indicate the Type of objective (Civ or Mil), the Size and the Priority, which are used by OPCOM's tactical decision making process. When making large or complex missions, it's also useful to take a screenshot of this preview for easy reference later.
Synchronise OPCOM
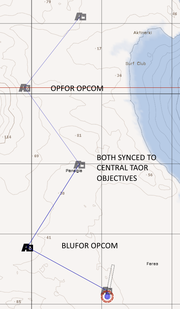
OPCOM needs two things: a bunch of military forces to order about and some Objectives to attack and defend. In this scenario, we want each OPCOM to defend their home TAORs but also attempt to capture Panagia. Therefore we need to sync(F5) the OPFOR OPCOM to the Northen Placement module (which is spawning the OPFOR units) and the central Panagia module in order to assign OPCOM to that TAOR as well. The same goes for the Southern BLUFOR OPCOM.


